


Viewing Ownership and Permissions
In Linux, each and every file is owned by a single user and a single group, and has its own access permissions. Let's look at how to view the ownership and permissions of a file.
The most common way to view the permissions of a file is to use
ls with the long listing option, e.g. ls -l myfile. If you want to view the permissions of all of the files in your current directory, run the command without an argument, like this.ls -l or llUnderstanding File attributes
Here is an example screenshot of what the output might look like, with labels of each column of output:
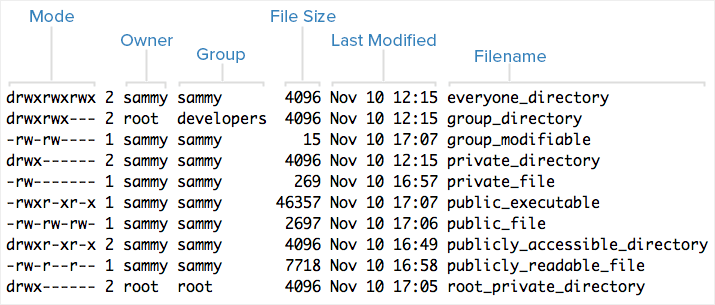
Note that each file's mode (which contains permissions), owner, group, and name are listed. Aside from theMode column, this listing is fairly easy to understand. To help explain what all of those letters and hyphens mean, let's break down the Mode column into its components.
Understanding Mode
To help explain what all the groupings and letters mean, take a look at this closeup of the mode of the first file in the example above:

File Types
In Linux, there are two basic types of files: normal and special. The file type is indicated by the first character of the mode of a file--in this guide, we refer to this as the file type field.
Normal files can be identified by files with a hyphen (
-) in their file type fields. Normal files are just plain files that can contain data. They are called normal, or regular, files to distinguish them from special files.
Special files can be identified by files that have a non-hyphen character, such as a letter, in their file type fields, and are handled by the OS differently than normal files. The character that appears in the file type field indicates the kind of special file a particular file is. For example, a directory, which is the most common kind of special file, is identified by the
d character that appears in its file type field (like in the previous screenshot). There are several other kinds of special files but they are not essential what we are learning here.
Examples:
d : Directory
- : Files
l : Link
when applying permissions to directories on Linux, the permission bits have different meanings than on regular files.
- The execute bit allows the affected user to enter the directory, and access files and directories inside
- The write bit allows the affected user to create, rename, or delete files within the directory, and modify the directory's attributes
- The read bit allows the affected user to list the files within the directory (Not get Acess to any inode)
- The sticky bit states that files and directories within that directory may only be
- deleted or renamed by their owner (or root)
Assigning Permissions
we can Assign permissons in two methods
1) Symbolic method
2) Absolute method
1) Symbolic method
2) Absolute method
Symbolic method
The first and probably easiest way is the relative (or symbolic) method, which lets you specify access classes and types with single letter abbreviations. A
chmod command with this form of syntax consists of at least three parts from the following lists:| Access Class | Operator | Access Type |
|---|---|---|
| u (user) | + (add access) | r (read) |
| g (group) | - (remove access) | w (write) |
| o (other) | = (set exact access) | x (execute) |
| a (all: u, g, and o) |
For example, to add permission for everyone to read a file in the current directory named
myfile, at the Unix prompt, you would enter:chmod a+r myfile
The
a stands for "all", the + for "add", and the r for "read".
Note:
This assumes that everyone already has access to the directory where
myfile is located and its parent directories; that is, you must set the directory permissions separately.
If you omit the access class, it's assumed to be all, so you could also enter the previous example as:
chmod +r myfile
You can also specify multiple classes and types with a single command. For example, to remove read and write permission for group and other users (leaving only yourself with read and write permission) on a file named
myfile, you would enter:chmod go-rw myfile
You can also specify that different permissions be added and removed in the same command. For example, to remove write permission and add execute for all users on
myfile, you would enter:chmod a-w+x myfile
In each of these examples, the access types that aren't specified are unchanged. The previous command, for example, doesn't change any existing settings specifying whether users besides yourself may have read (
r) access to myfile. You could also use the exact form to explicitly state that group and other users' access is set only to read with the = operator:chmod go=r myfile
The
chmod command also operates on directories. For example, to remove write permission for other users on a subdirectory named mydir, you would enter:chmod o-w mydir
To do the same for the current directory, you would enter:
chmod o-w
Be careful when setting the permissions of directories, particularly your home directory; you don't want to lock yourself out by removing your own access. Also, you must have execute permission on a directory to switch (
cd) to it.Absolute form
The other way to use the
chmod command is the absolute form. In this case, you specify a set of three numbers that together determine all the access classes and types. Rather than being able to change only particular attributes, you must specify the entire state of the file's permissions.
The three numbers are specified in the order: user (or owner), group, other. Each number is the sum of values that specify read (4), write (2), and execute (1) access, with 0 (zero) meaning no access. For example, if you wanted to give yourself read, write, and execute permissions on
myfile; give users in your group read and execute permissions; and give others only execute permission, the appropriate number would be calculated as (4+2+1)(4+0+1)(0+0+1) for the three digits 751. You would then enter the command as:chmod 751 myfile
As another example, to give only yourself read, write, and execute permission on the current directory, you would calculate the digits as (4+2+1)(0+0+0)(0+0+0) for the sequence 700, and enter the command:
chmod 700
If it seems clearer to you, you can also think of the three digit sequence as the sum of attributes you select from the following table:
| 400 | Read by owner |
| 200 | Write by owner |
| 100 | Execute by owner |
| 040 | Read by group |
| 020 | Write by group |
| 010 | Execute by group |
| 004 | Read by others |
| 002 | Write by others |
| 001 | Execute by others |
To create an access mode, sum all the accesses you wish to permit. For example, to give read privileges to all, and write and execute privileges to the owner only for a file, you would sum: 400+200+100+040+004 = 744. Then, at the Unix prompt, you would enter:
chmod 744 myfile.ext
Some other frequently used examples are:
| 777 |
anyone can do anything (read, write, or execute)
|
| 755 |
you can do anything; others can only read and execute
|
| 711 |
you can do anything; others can only execute
|
| 644 |
you can read and write; others can only read
|
Deep In File Permissions
1) Directory "Test" with only read permission
[mithz@localhost ~]$ cd test
bash: cd: test: Permission denied
[mithz@localhost ~]$ ls -l ./test
ls: cannot access ./test/one.txt: Permission denied
ls: cannot access ./test/two.txt: Permission denied
total 0
?????????? ? ? ? ? ? one.txt?????????? ? ? ? ? ? two.txt
>Cant enter into Directory
>List only the names but cant acess any information stored in inodes eg:size,permissions,modified time etc:-
with only Write permissions :-
[mithz@localhost ~]$ cd test
bash: cd: test: Permission denied
bash: cd: test: Permission denied
[mithz@localhost ~]$ ls test
ls: cannot open directory test: Permission denied
[mithz@localhost ~]$ cat ./test/one.txt
cat: ./test/one.txt: Permission denied
with only Execute Permissions:-
[mithz@localhost ~]$ cd test
[mithz@localhost test]$ ls -l
ls: cannot open directory .: Permission denied
[mithz@localhost test]$ cat one.txt
yes u can read me now :-)!!!
One way I use SUID on my machine
I have a few files that I modify through Linux and then before I shutdown Linux I have to transfer them to my Windows partition for further use there. As a normal user I do not have write access to the Windows partitions that I have mounted. So I have to be the superuser to be able to write to that partition. I have created a simple shell script that copies my files to the Windows partitions. This script was created by root user and the SUID bit was set. Access rights to this script have been given to all users. Now whenever I want to copy my files I simply run this script. Even though I have logged in as a normal user, the SUID bit which is set causes this script to execute as if the root was executing it and it allows me to write to the Windows partitions.
Had the SUID bit not been set, I would have to type ' su ' at the prompt and get temporary superuser access to get write access to the Windows partitions. Hope you got the point..
Note : In case you do not know how to access your Windows partitions through Linux, refer to Article No. 3
You may be thinking that since these applications would run as root they can do harmful things and destroy the system. The concept behind SUID bit is that you as the superuser would be able to allow certain applications / scripts to be run by the users as if they were the superuser for the time being. What these application / scripts do when they execute should be completely known to you. Even though the users would be allowed to execute these programs as root they would be able to do ONLY THOSE things that these programs were designed to do. So in case a script was designed to copy 5 files from one place to another. Then the user who would run that script would be able to ONLY copy those 5 files from one place to another. He would not be able to modify that script in any way since he would not have write access to the script. He would only be having execute rights for that script. Hence its an excellent idea to allow users to do some important backup using a script that does only that and by setting the SUID bit for that script. This way the users don't have to know the superuser password but can still use some facilities that are only available to the superuser
Important : Think twice before setting the SUID bit for scripts (owned by root) that take arguments at the command line. Since you never know what parameters a malicious user may pass to your script. Since the script would run as root it could do great damage if misused.


