Sunday 25 October 2015

Perform Basic File Editing Operations Using vi/m

Vi was the first full-screen text editor written for Unix. Although it was intended to be small and simple, it can be a bit challenging for people used exclusively to GUI text editors, such as NotePad++, or gedit, to name a few examples.

To use Vi, we must first understand the 3 modes in which this powerful program operates, in order to begin learning later about the its powerful text-editing procedures.
Please note that most modern Linux distributions ship with a variant of vi known as vim (“Vi improved”), which supports more features than the original vi does. For that reason, throughout this tutorial we will use vi and vim interchangeably.
If your distribution does not have vim installed, you can install it as follows.
  1. Ubuntu and derivatives: aptitude update && aptitude install vim
  2. Red Hat-based distributions: yum update && yum install vim
  3. openSUSE: zypper update && zypper install vim

Why should I want to learn vi?

There are at least 2 good reasons to learn vi.
1. vi is always available (no matter what distribution you’re using) since it is required by POSIX.
2. vi does not consume a considerable amount of system resources and allows us to perform any imaginable tasks without lifting our fingers from the keyboard.
In addition, vi has a very extensive built-in manual, which can be launched using the :help command right after the program is started. This built-in manual contains more information than vi/m’s man page.
vi Man Pages
vi Man Pages

Launching vi

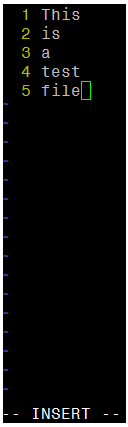
To launch vi, type vi in your command prompt.
Start vi Editor
Start vi Editor
Then press i to enter Insert mode, and you can start typing. Another way to launch vi/m is.
# vi filename
Which will open a new buffer (more on buffers later) named filename, which you can later save to disk.

Understanding Vi modes

1. In command mode, vi allows the user to navigate around the file and enter vi commands, which are brief, case-sensitive combinations of one or more letters. Almost all of them can be prefixed with a number to repeat the command that number of times.
For example, yy (or Y) copies the entire current line, whereas 3yy (or 3Y) copies the entire current line along with the two next lines (3 lines in total). We can always enter command mode (regardless of the mode we’re working on) by pressing the Esc key. The fact that in command mode the keyboard keys are interpreted as commands instead of text tends to be confusing to beginners.
2. In ex mode, we can manipulate files (including saving a current file and running outside programs). To enter this mode, we must type a colon (:) from command mode, directly followed by the name of the ex-mode command that needs to be used. After that, vi returns automatically to command mode.
3. In insert mode (the letter i is commonly used to enter this mode), we simply enter text. Most keystrokes result in text appearing on the screen (one important exception is the Esc key, which exits insert mode and returns to command mode).
vi Insert Mode
vi Insert Mode

Vi Commands

The following table shows a list of commonly used vi commands. File edition commands can be enforced by appending the exclamation sign to the command (for example, <b.:q! enforces quitting without saving).
 Key command  Description
 h or left arrow  Go one character to the left
 j or down arrow  Go down one line
 k or up arrow  Go up one line
 l (lowercase L) or right arrow  Go one character to the right
 H  Go to the top of the screen
 L  Go to the bottom of the screen
 G  Go to the end of the file
 w  Move one word to the right
 b  Move one word to the left
 0 (zero)  Go to the beginning of the current line
 ^  Go to the first nonblank character on the current line
 $  Go to the end of the current line
 Ctrl-B  Go back one screen
 Ctrl-F  Go forward one screen
 i  Insert at the current cursor position
 I (uppercase i)  Insert at the beginning of the current line
 J (uppercase j)  Join current line with the next one (move next line up)
 a  Append after the current cursor position
 o (lowercase O)  Creates a blank line after the current line
 O (uppercase o)  Creates a blank line before the current line
 r  Replace the character at the current cursor position
 R  Overwrite at the current cursor position
 x  Delete the character at the current cursor position
 X  Delete the character immediately before (to the left) of the current cursor position
 dd  Cut (for later pasting) the entire current line
 D  Cut from the current cursor position to the end of the line (this command is equivalent to d$)
 yX  Give a movement command X, copy (yank) the appropriate number of characters, words, or lines from the current cursor position
 yy or Y  Yank (copy) the entire current line
 p  Paste after (next line) the current cursor position
 P  Paste before (previous line) the current cursor position
 . (period)  Repeat the last command
 u  Undo the last command
 U  Undo the last command in the last line. This will work as long as the cursor is still on the line.
 n  Find the next match in a search
 N  Find the previous match in a search
 :n  Next file; when multiple files are specified for editing, this commands loads the next file.
 :e file  Load file in place of the current file.
 :r file  Insert the contents of file after (next line) the current cursor position
 :q  Quit without saving changes.
 :w file  Write the current buffer to file. To append to an existing file, use :w >> file.
 :wq  Write the contents of the current file and quit. Equivalent to x! and ZZ
 :r! command  Execute command and insert output after (next line) the current cursor position.

Vi Options

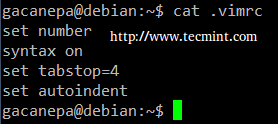
The following options can come in handy while running vim (we need to add them in our ~/.vimrc file).
# echo set number >> ~/.vimrc
# echo syntax on >> ~/.vimrc
# echo set tabstop=4 >> ~/.vimrc
# echo set autoindent >> ~/.vimrc
vi Editor Options
vi Editor Options
  1. set number shows line numbers when vi opens an existing or a new file.
  2. syntax on turns on syntax highlighting (for multiple file extensions) in order to make code and config files more readable.
  3. set tabstop=4 sets the tab size to 4 spaces (default value is 8).
  4. set autoindent carries over previous indent to the next line.

Search and replace

vi has the ability to move the cursor to a certain location (on a single line or over an entire file) based on searches. It can also perform text replacements with or without confirmation from the user.
a). Searching within a line: the f command searches a line and moves the cursor to the next occurrence of a specified character in the current line.
For example, the command fh would move the cursor to the next instance of the letter h within the current line. Note that neither the letter f nor the character you’re searching for will appear anywhere on your screen, but the character will be highlighted after you press Enter.
For example, this is what I get after pressing f4 in command mode.
Search String in Vi
Search String in Vi
b). Searching an entire file: use the / command, followed by the word or phrase to be searched for. A search may be repeated using the previous search string with the n command, or the next one (using the N command). This is the result of typing /Jane in command mode.
Vi Search String in File
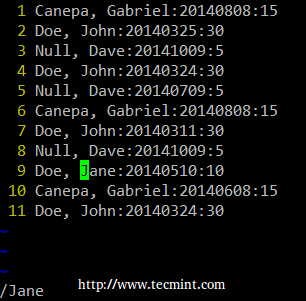
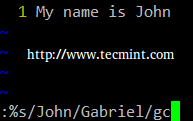
c). vi uses a command (similar to sed’s) to perform substitution operations over a range of lines or an entire file. To change the word “old” to “young” for the entire file, we must enter the following command.
 :%s/old/young/g 
Notice: The colon at the beginning of the command.
Vi Search and Replace
The colon (:) starts the ex command, s in this case (for substitution), % is a shortcut meaning from the first line to the last line (the range can also be specified as n,m which means “from line n to line m”), old is the search pattern, while young is the replacement text, and g indicates that the substitution should be performed on every occurrence of the search string in the file.
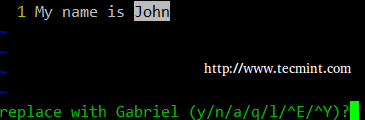
Alternatively, a c can be added to the end of the command to ask for confirmation before performing any substitution.
:%s/old/young/gc
Before replacing the original text with the new one, vi/m will present us with the following message.
Replace String in Vi
  1. y: perform the substitution (yes)
  2. n: skip this occurrence and go to the next one (no)
  3. a: perform the substitution in this and all subsequent instances of the pattern.
  4. q or Esc: quit substituting.
  5. l (lowercase L): perform this substitution and quit (last).
  6. Ctrl-e, Ctrl-y: Scroll down and up, respectively, to view the context of the proposed substitution.

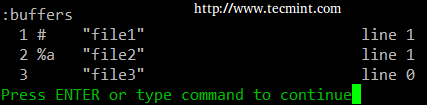
Editing Multiple Files at a Time

Let’s type vim file1 file2 file3 in our command prompt.
# vim file1 file2 file3
First, vim will open file1. To switch to the next file (file2), we need to use the :n command. When we want to return to the previous file, :N will do the job.
In order to switch from file1 to file3.
a). The :buffers command will show a list of the file currently being edited.
:buffers
Edit Multiple Files
Edit Multiple Files
b). The command :buffer 3 (without the s at the end) will open file3 for editing.
In the image above, a pound sign (#) indicates that the file is currently open but in the background, while %a marks the file that is currently being edited. On the other hand, a blank space after the file number (3 in the above example) indicates that the file has not yet been opened.

Temporary vi buffers

To copy a couple of consecutive lines (let’s say 4, for example) into a temporary buffer named a (not associated with a file) and place those lines in another part of the file later in the current vi section, we need to…
1. Press the ESC key to be sure we are in vi Command mode.
2. Place the cursor on the first line of the text we wish to copy.
3. Type “a4yy to copy the current line, along with the 3 subsequent lines, into a buffer named a. We can continue editing our file – we do not need to insert the copied lines immediately.
4. When we reach the location for the copied lines, use “a before the p or P commands to insert the lines copied into the buffer named a:
  1. Type “ap to insert the lines copied into buffer a after the current line on which the cursor is resting.
  2. Type “aP to insert the lines copied into buffer a before the current line.
If we wish, we can repeat the above steps to insert the contents of buffer a in multiple places in our file. A temporary buffer, as the one in this section, is disposed when the current window is closed.

Summary

As we have seen, vi/m is a powerful and versatile text editor for the CLI. Feel free to share your own tricks and comments below.

 User and Group Management in Linux


Linux files responsible for User managements

/etc/shadow Store all the Linux password in MD5 encryptions format
/etc/passwd Store all user related information's 
/etc/gshadow Store all group in MD5 encryptions format 
/etc/group Store all group related information's


Understanding /etc/passwd
The full account information is stored in the /etc/passwd file. This file contains a record per system user account and has the following format (fields are delimited by a colon).


[username]:[x]:[UID]:[GID]:[Comment]:[Home directory]:[Default shell]


Understanding /etc/shadow


 mithz:$1$.QKDPc5E$SWlkjRWexrXYgc98F.:12825:0:99999:5:30:13096: 
  1. Username (mithz) : Login user name.
  2. Password ($6$sTgBhfj0$pkzz/JpVTk./d4SDarljywUH8/TgNzL5rxtFlpsIsyi.i1) : It’s your encrypted password. A blank entry (eg. ::) indicates a password is not required to log in (usually a bad idea), and a ``*'' entry (eg. :*:) indicates the account has been disabled
  3. Last Changed Date(12825) : Last password set/changed date.
  4. Minimum days (0) : How many days remaining to change new password of user.
  5. Maximum days (99999) : How many days the password to be valid for user.
  6. Warn days (7) : This will show the warning message to user, how many days remaining to update/change the new password.
  7. Inactive days () : After password expired, it will be disabled the user account for mentioned days (date).
  8. Expire date () : Within the mentioned (Expire) date, the account has been disabled and user can’t login to system.


Useradd Command

useradd  is used to create user. Several options are used with useradd command but you will learn about them in our next assignments. In this assignment you are going to learn what exactly happen in these files when a new user is added. First watch carefully last lines of these files.

Add a user.

#useradd vinita
#passwd vinita 
linux User managements
if u are not set password for a user it will be in locked state.

When a new user account is added to the system, the following operations are performed.


1. His/her home directory is created (/home/username by default).
2. The following hidden files are copied into the user’s home directory, and will be used to provide environment variables for his/her user session.
 
.bash_logout
.bash_profile
.bashrc
 
3. A mail spool is created for the user at /var/spool/mail/username.
4. A group is created and given the same name as the new user account.


(useradd  jishnu  -u 504  -d /home/jishnu  -c second-admin -s /bin/bash)

How to create a user without password.

linux User managements
To create a user without password use –d switch .
#useradd nikki
#passwd -d nikki 


Usermod Command 


The linux command “usermod” is used to modify a user’s information. The files that may be affected during this operation are /etc/passwd (user account information), /etc/shadow (secure account information) and /etc/group (group information). Only root/super user can use this command.
usermod [-c comment] [-d home_dir [-m]] [-e expire_date] [-f inactive_time]
[-g initial_group] [-G group [,...]] [-l login_name] [-p passwd]
[-s shell] [-u uid [-o]] [-L|-U]login
In this article, we will go through some example usages of “usermod” command which will help you to learn these options in detail. First we can create a user “test” using useradd. In order to view user information, we can use the “id command.
# id test
uid=501(test) gid=501(test) groups=501(test)

Example 1: Changing the home directory of user “test”

Suppose the current home directory of the user “test” is /home/test and you want to change it to the existing directory /home/testnew without copying the contents of /home/test, you can use the following command.
#usermod –d /home/testnew test
If you want to move the contents of /home/test also (if the new directory doesn’t exist, it will create and move), you need to use the option “-m”.
#usermod –d /home/testnew –m test

Example 2: Adding groups to a user

When a user is added using “useradd” command without specifying group, then a group with the same name as that of user will be created. This is the primary group of the user. You can add as many groups to a user using the option “-G” as follows.
Suppose, you need to add a group “developer” to the user “test”, you can add it as follows.
#usermod –G developer test
Please note that, if you added the user to any other groups earlier (other than the primary group), that will get removed by the above command.
So, if you want to preserve the current groups of the user and add one more group you need to use the option –aG as follows.
#usermod –aG developer test
# id test
uid=501(test) gid=501(test) groups=501(test),506(pros),508(developer)

Example 3: Changing the primary group of a user

If you want to add a group as the primary group of the user, you can do it as follows.
# usermod –g developer test
# id test
uid=501(test) gid=508(developer) groups=508(developer), 506(pros)

Example 4: Locking and Unlocking users

In some cases, you may need to temporarily lock the account. This can be done with the “-L” option. This puts a '!' in front of the encrypted password, effectively disabling the password.
# usermod –L test
User can be unlocked as follows which will remove the '!' in front of the encrypted password.
# usermod –U test

Example 5: Changing the expiry data of an account

You can use the following command to disable the account “test” on 2012-12-01.
usermod -e 2012-12-01 test

Example 6: Changing login name and password using usermod

You can change the login name itself using the –l switch.
# usermod –l newtest test
# id test
Id: test: No such user
# id newtest
uid=501(newtest) gid=508(developer) groups=508(developer), 506(pros)
You can change the password as follows.
# usermod –p newpass newtest

Example 7: Changing shell of a user

The “shell” provided to a user can be changed as follows. This will change the shell of “newtest” user to “/bin/bash”.
# usermod –s /bin/bash newtest


Chage Command (Change Aging)


1. List the password and its related details for an user

As shown below, any user can execute the chage command for himself to identify when his password is about to expire.
Syntax: chage –-list username (or) chage -l username

$ chage --list dhinesh
Last password change                                    : Apr 01, 2009
Password expires                                        : never
Password inactive                                       : never
Account expires                                         : never
Minimum number of days between password change          : 0
Maximum number of days between password change          : 99999
Number of days of warning before password expires       : 7
  If user dhinesh tries to execute the same command for user ramesh, he’ll get the following permission denied message.
$ chage --list ramesh
chage: permission denied
  Note: However, a root user can execute chage command for any user account.   When user dhinesh changes his password on Apr 23rd 2009, it will update the “Last password change” value as shown below.  
$ date
Thu Apr 23 00:15:20 PDT 2009

$ passwd dhinesh
Enter new UNIX password:
Retype new UNIX password:
passwd: password updated successfully

$ chage --list dhinesh
Last password change                                    : Apr 23, 2009
Password expires                                        : never
Password inactive                                       : never
Account expires                                         : never
Minimum number of days between password change          : 0
Maximum number of days between password change          : 99999
Number of days of warning before password expires       : 7

2. Set Password Expiry Date for an user using chage option -M

Root user (system administrators) can set the password expiry date for any user. In the following example, user dhinesh password is set to expire 10 days from the last password change.   Please note that option -M will update both “Password expires” and “Maximum number of days between password change” entries as shown below.
Syntax: # chage -M number-of-days username

# chage -M 10 dhinesh

# chage --list dhinesh
Last password change                                    : Apr 23, 2009
Password expires                                        : May 03, 2009
Password inactive                                       : never
Account expires                                         : never
Minimum number of days between password change          : 0
Maximum number of days between password change          : 10
Number of days of warning before password expires       : 7

3. Password Expiry Warning message during login

By default the number of days of warning before password expires is set to 7. So, in the above example, when the user dhinesh tries to login on Apr 30, 2009 — he’ll get the following message.
$ ssh dhinesh@testingserver
dhinesh@testingserver's password:
Warning: your password will expire in 3 days

4. User Forced to Change Password after Expiry Date

If the password expiry date reaches and user doesn’t change their password, the system will force the user to change the password before the login as shown below.
$ ssh dhinesh@testingserver
dhinesh@testingserver's password:

You are required to change your password immediately (password aged)
WARNING: Your password has expired.
You must change your password now and login again!
Changing password for dhinesh
(current) UNIX password:
Enter new UNIX password:
Retype new UNIX password:

5. Set the Account Expiry Date for an User

You can also use chage command to set the account expiry date as shown below using option -E. The date given below is in “YYYY-MM-DD” format. This will update the “Account expires” value as shown below.
# chage -E "2009-05-31" dhinesh

# chage -l dhinesh
Last password change                                    : Apr 23, 2009
Password expires                                        : May 03, 2009
Password inactive                                       : never
Account expires                                         : May 31, 2009
Minimum number of days between password change          : 0
Maximum number of days between password change          : 10
Number of days of warning before password expires       : 7

6. Force the user account to be locked after X number of inactivity days

Typically if the password is expired, users are forced to change it during their next login. You can also set an additional condition, where after the password is expired, if the user never tried to login for 10 days, you can automatically lock their account using option -I as shown below. In this example, the “Password inactive” date is set to 10 days from the “Password expires” value.   Once an account is locked, only system administrators will be able to unlock it.
# chage -I 10 dhinesh

# chage -l dhinesh
Last password change                                    : Apr 23, 2009
Password expires                                        : May 03, 2009
Password inactive                                       : May 13, 2009
Account expires                                         : May 31, 2009
Minimum number of days between password change          : 0
Maximum number of days between password change          : 10
Number of days of warning before password expires       : 7

7. How to disable password aging for an user account

To turn off the password expiration for an user account, set the following:
  • -m 0 will set the minimum number of days between password change to 0
  • -M 99999 will set the maximum number of days between password change to 99999
  • -I -1 (number minus one) will set the “Password inactive” to never
  • -E -1 (number minus one) will set “Account expires” to never.
# chage -m 0 -M 99999 -I -1 -E -1 dhinesh

# chage --list dhinesh
Last password change                                    : Apr 23, 2009
Password expires                                        : never
Password inactive                                       : never
Account expires                                         : never
Minimum number of days between password change          : 0
Maximum number of days between password change          : 99999
Number of days of warning before password expires       : 7


How to delete User

userdel command is used to delete user. When a user is deleted user's primary group will automatically be deleted.
#userdel nikki
#groupdel nikki groupdel: group nikki does not exist. 


linux User managements

Whenever you delete user with userdel command. entry of user will be removed from these files. But users home folder and mail folder will not be deleted. As you can see in image. If you want completely remove user including his home folder and mail folder use –r switch with userdel commands.

Remove user with all related  files (home dir,mail box)


userdel -r username 


ADDITIONAL INFO :-)

Q: How do you know what default values would be assigned to a user when created using useradd command?

A: These are the two files which contain the default values to be assigned to a user when created using useradd

1) /etc/default/useradd
2) /etc/login.defs


# less /etc/default/useradd
GROUP=100
HOME=/home
INACTIVE=-1
EXPIRE=
SHELL=/bin/bash
SKEL=/etc/skel
CREATE_MAIL_SPOOL=yes

You can also view the default parameters set for new user to be created using
# useradd -D
GROUP=100
HOME=/home
INACTIVE=-1
EXPIRE=
SHELL=/bin/bash
SKEL=/etc/skel
CREATE_MAIL_SPOOL=yes

The second file containing values used by useradd command for UID, GID, password encryption method and expiry related information
# less /etc/login.defs
MAIL_DIR        /var/spool/mail

PASS_MAX_DAYS   99999
PASS_MIN_DAYS   0
PASS_MIN_LEN    5
PASS_WARN_AGE   7

UID_MIN                   500
UID_MAX                 60000

GID_MIN                   500
GID_MAX                 60000

CREATE_HOME     yes
UMASK           077

USERGROUPS_ENAB yes
ENCRYPT_METHOD SHA512


Create a USER Account with ROOT Privileges

Lets say we need to add a new user and grand him root privileges.
Use the following commands to create the new user john, grand him the same privileges as root and set him a password :
# useradd -ou 0 -g 0 john
# passwd john
We've just created the user john, with UID 0 and GID 0, so he is in the same group and has the same permissions as root.

Grant ROOT Privileges to an Existing USER

Perhaps you already have some user john and you would like to give root permissions to a normal user.
# grep john /etc/passwd
john:x:1001:1001::/home/john:/bin/sh
Edit /etc/passwd file and grant root permissions to the user john by changing User and Group IDs to UID 0 and GID 0 :
# $ grep john /etc/passwd
john:x:0:0::/home/john:/bin/sh

Delete a USER Account with UID 0

You won't be able to delete second root user with another UID 0 using userdelcommand.
# userdel john
userdel: user john is currently used by process 1

To delete user john with UID 0, open /etc/passwd file and change john's UID.
For example, change the line :
john:x:0:0::/home/john:/bin/sh
to something like :
john:x:1111:0::/home/john:/bin/sh
Now, you'll be able to delete user john with userdel command :
# userdel john                                                                                                                       


What is the difference between .bash_profile and .bashrc?


Ans: Every time you login to a Linux (Red Hat) machine .bash_profile file is executed
but
In case you are already logged in and you open a new terminal then .bashrc file is executed


Sunday 11 October 2015

Amazing Linux Facts
GNU/Linux, inspired from UNIX, has become the most widely adopted server operating systems out there. Adopters of Linux includes tech giants like Google, Facebook, Twitter, Yahoo, Amazon, and the list goes on and on.. The adoption rate of Linux in Desktop market cannot be calculated accurately, because, unlike proprietary software, the sources from where people get their copies are myriad and are various (hence getting a true estimate is really difficult).  Learning and exploring things in Linux is quite fascinating and exciting. Thanks to the hard work of millions of developers, who contributed to the development of Linux, and have made it reach the place where it is today.

In this post, I will be discussing some of the amazing facts, about Linux, that are lessor known to most of its users.

1. “LINUX”, is a directory  name on FUNET’s FTP server (ftp://ftp.funet.fi/)
Yes, you heard it right!. Linux Torvalds wanted to name his kernel "Freax". Well the name is a combination of words "freak" and "free", and then the final X to represent its similarity with the Unix operating system.
When the initial code was uploaded to an FTP server (ftp://ftp.funet.fi/), the server administrator (Ari Lemmke) didn't like the name Freax, and he suggested the name Linux and gave a directory on the ftp server. The directory on the ftp server was called "linux". You can access this very directory here: ftp://ftp.funet.fi/pub/linux/

And if you want the first initial kernel package that was made available to the public, visit this link: ftp://ftp.funet.fi/pub/linux/kernel/Historic/

2."Linux" is only the kernel, and is not the full system that you use
Well Linux is just a part of the entire system. Its the program that allocates resources that other programs need during their operation. So, the system that is used is normally a combination of GNU system and Linux.  Since 1984, GNU had been working to make a full operating system of its own, that was going to be a free Unix like operating system.
In fact by the early 90's a full GNU operating system was ready, aside from the kernel. A full operating system requires, compilers, text editors, X windows systems.
The GNU project even had a kernel of its own called "GNU Hurd", but was not yet completely ready. That main gap was filled by Linux kernel (from Torvalds) in 1992.
Refer the below link for more details on the GNU/Linux System from "Richard Stallman" (The man behind the free software movement.)
Read: Richard Stallman on Linux and GNU

3. More than 90% of current Linux source code is written by other developers (and not Linus Torvalds himself)
The Linux project was adopted by so many programmers and the project grew very rapidly after 1996. The initial release from Torvalds was 10,000 lines of code and now it has reached many millions in total number. 
Its roughly estimated that more than 10000 developers from many different countries and companies have contributed to its development till date. And are rapidly increasing in number. More and more features are being added on a regular basis. And most of this coding is from the contributors.

  4. Even Microsoft Contributes to Linux Kernel Development!
Yes the company whose main philosophy rests on proprietary software development, also contributes to Linux. It even went ahead of Canonical once, in the number of lines of code contributed to kernel. The top list of contributors includes Red Hat, Intel, etc.
Do not think that Microsoft is contributing to kernel development for improving the kernel. Its for better support of Hyper-V hypervisor on Linux :)

5. Most of the Super Computer's use Linux. And the numbers are growing on a yearly basis
Read: Operating System's on Super Computers
More than 90 percent of the world's fastest computer's use's Linux. Linux has become a choice for high performance computing. It was only 1 to 2 percent adoption in 1998 and in the last 15 years it grew up to more than 90 percent, which is really phenomenal.
Community resources, ease of management, open source and freedom of use, security, compatibility etc, have contributed to level of adoption in high performance computing.

6. An operating System called Minix inspired Linus Torvalds for making Linux
Minix is very much similar to Unix. It was created by Andrew S. Tanenbaum, Am sure you might have heard this name before during your college days. Most of the people know him by a very famous book he wrote on Operating System. The name of the book is Operating Systems: Design and Implementation
The very famous initial email from Linus Torvalds (during the release of the very first Linux kernel to the world) started with "Hello everybody out there using minix...."

Popular Posts

Recent Posts

Unordered List

Categories

Text Widget

Powered by Blogger.

Home - PageNavi (show/hide)

Ads

Pages